サーバから自由にカスタマイズ可能なメニューを実装する
メニューの項目や階層構造をアプリのリリース後に自由に変更できるようにしたいことがあります。
基幹系アプリの場合によくある理由として
- 常時通信環境で運用するわけではない
- 運用してみないとよりよいメニュー構造がわからない
- iOS技術者ではない運用者がメニュー階層を簡単に弄りたい
- WebViewでは野暮ったい などなど
確かにメニュー階層はアプリ使い勝手を左右する重要な部分なのでよく納得できる内容です。
今回、メニュー構成(plist)をWeb上に配置して自由にカスタマイズできるような実装を行なってみました。要件としては下記のような感じです。
- UITableViewのメニュー情報は全て外部リソース(Menu.plist)に保持する
- 初回は通信からメニュー情報を読込キャッシュして、次回移行はキャッシュから読み込む
- メニューの情報は手動で通信してアップデートする
若干変態的なのですがメニューはUITableViewを動的な作りにして実装します。
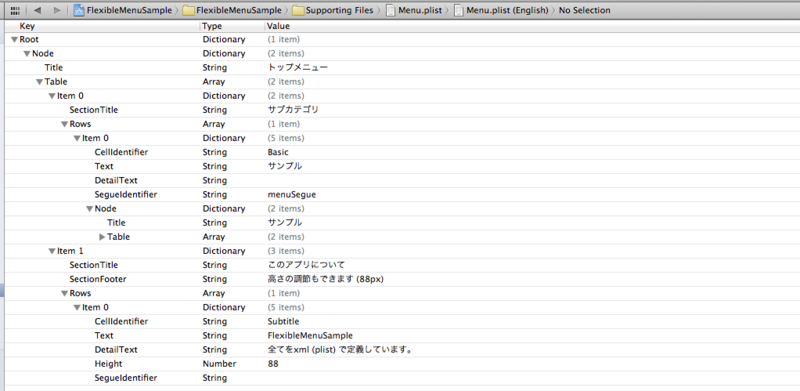
Menu.plistの構造
メニューを構成する必要な情報は全てMenu.plistに保持するように定義します。
- Root (Dictionary)
- Node (Dictionary) ※ルート画面の情報
- Title (String) ※タイトルバー
- Table (Array)
- Item (Dictionary) ※1セクションの情報
- SectionTitle (String) ※セクションの表示文字
- SectionFooter (String) ※フッターの表示文字
- Rows (Array)
- Item (Dictionary) ※1セルの情報
- CellIdentifier (String) ※セルのID、CellのStyleを定義
- Text (String) ※セルの表示文字
- DetailText (String) ※セル詳細の表示文字
- Height (Number) ※セルの高さ
- SegueIdentifier (String) ※セル選択時の起動SegueID、遷移先を定義
- Node (Dictionary) ※次画面の情報 (以下繰返)
- Item (Dictionary) ※1セルの情報
- Item (Dictionary) ※1セクションの情報
- Node (Dictionary) ※ルート画面の情報
メニューアップデート時の通信を1トランザクションで終わらせるために遷移先の画面情報もMenu.plistの1ファイルで保持するようにしました。
Storyboardの定義
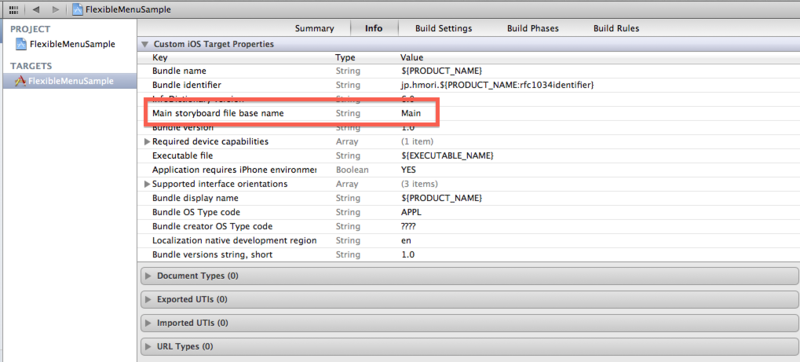
ここではStoryboardの名前をMain (Main.storyboard)とします。起動時のInfo.plistのstoryboard名をMainに定義します。
この際、AppDelegateのdidFinishLaunchingWithOptionsではwindowの初期化を行わないようにします。
AppDelegate.m
- (BOOL)application:(UIApplication *)application didFinishLaunchingWithOptions:(NSDictionary *)launchOptions {
    return YES;
}
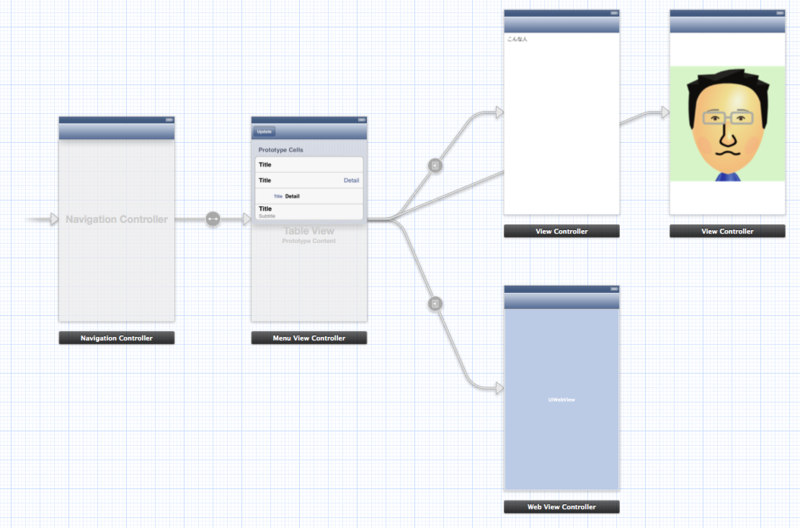
MenuViewContollerと遷移されるLeaf(葉)となるViewContollerを全て定義し、LeafへのSegueはmanual定義するようにしておきます。
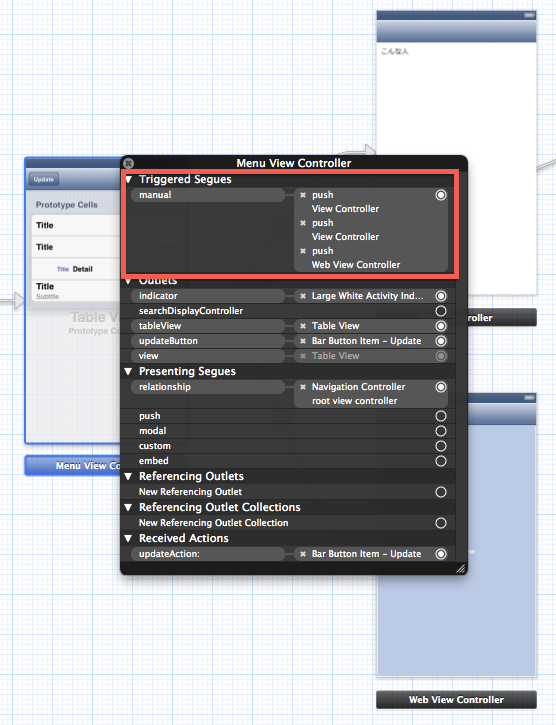
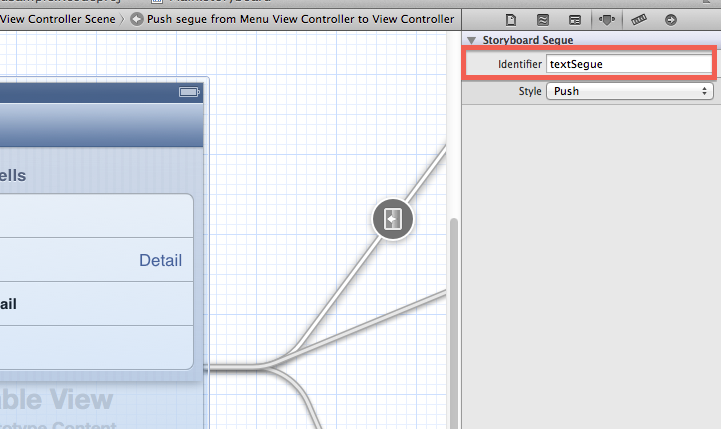
Segueのmanual定義は、MenuViewControllerのバー部分を右クリックしてTriggered Segueのmanualから引っ張ります。またSegueを起動するためIDを振っておきます。
manual定義した場合、条件によりUIViewController#performSegueWithIdentifier:sender: で分岐させることが可能となります。
MenuViewControllerにUITableViewCellをStyle分用意してそれぞれIDを振ります。(Basic、RightDetail、LeftDetail、Subtitle)
Segueは遷移処理(アニメーション等)を定義するものですが、遷移先(Leaf)に対して1本用意してIDによりSegueを呼び出すようにします。多段階層メニューなのでMenuViewControllerをループさせるmanual定義はStoryboardから行えないので、ソース内で手動で処理します。
MenuViewControllerのTableViewの実装
Node(1画面の表示情報)をNSDictionaryで保持し、各UITableViewのDataSource、Delegateを実装します。
FMMenuViewController.h
@interface FMMenuViewController : UITableViewController {
    NSDictionary *_node;
}
@property (strong, nonatomic) NSDictionary *node;
@end
FMMenuViewController.m DataSource
- (NSInteger)numberOfSectionsInTableView:(UITableView *)tableView {
    return [[self tables] count];
}

- (NSString *)tableView:(UITableView *)tableView titleForHeaderInSection:(NSInteger)section {
    return [[self sectionItem:section] objectForKey:kSectionTitle];
}

- (NSString *)tableView:(UITableView *)tableView titleForFooterInSection:(NSInteger)section {
    return [[self sectionItem:section] objectForKey:kSectionFooter];
}

- (NSInteger)tableView:(UITableView *)tableView numberOfRowsInSection:(NSInteger)section {
    return [[self rows:section] count];
}

- (CGFloat)tableView:(UITableView *)tableView heightForRowAtIndexPath:(NSIndexPath *)indexPath {
    CGFloat height = [[[self rowItem:indexPath] objectForKey:kHeight] floatValue];
    if (height <= 0) {
        return 44.0f; //default height
    }
    return height;
}

- (UITableViewCell *)tableView:(UITableView *)tableView cellForRowAtIndexPath:(NSIndexPath *)indexPath {
    NSDictionary *rowItem = [self rowItem:indexPath];
    NSString *cellIdentifier = [rowItem objectForKey:kCellIdentifier];
    UITableViewCell *cell = [tableView dequeueReusableCellWithIdentifier:cellIdentifier];

    cell.textLabel.text = [rowItem objectForKey:kText];
    cell.detailTextLabel.text = [rowItem objectForKey:kDetailText];

    NSString *segueIdentifier = [rowItem objectForKey:kSegueIdentifier];
    if (segueIdentifier.length > 0) {
        cell.accessoryType = UITableViewCellAccessoryDisclosureIndicator;
    } else {
        cell.accessoryType = UITableViewCellAccessoryNone;
    }
    return cell;
}

#pragma mark - Private methods
- (NSArray *)tables {
    return [_node objectForKey:kTable];
}

- (NSDictionary *)sectionItem:(NSInteger)section {
    return [[self tables] objectAtIndex:section];
}

- (NSArray *)rows:(NSInteger)section {
    return [[[self tables] objectAtIndex:section] objectForKey:kRows];
}

- (NSDictionary *)rowItem:(NSIndexPath *)indexPath {
    return [[self rows:indexPath.section] objectAtIndex:indexPath.row];
}
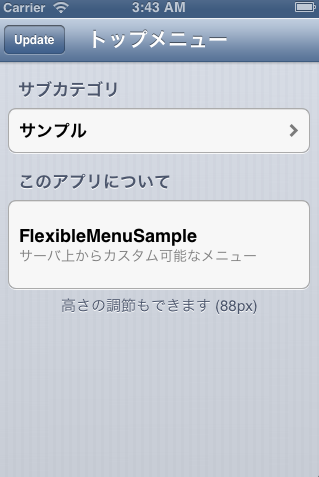
特定のCell情報、Rows->ItemにsegueIdentifierが定義されていない場合は、アクセサリにDisclosure Indicator (青の右矢印)をつけないようにしています。
FMMenuViewController.m Delegate
- (void)tableView:(UITableView *)tableView didSelectRowAtIndexPath:(NSIndexPath *)indexPath {
    NSDictionary *rowItem = [self rowItem:indexPath];
    NSString *segueIdentifier = [rowItem objectForKey:kSegueIdentifier];

    if (segueIdentifier.length > 0) {
        if ([segueIdentifier isEqualToString:kMenuSegue]) {
            UIStoryboard *storyboard = [UIStoryboard storyboardWithName:kStoryboardIdentifier bundle:nil];
            FMMenuViewController *ctl = [storyboard instantiateViewControllerWithIdentifier:kMenuControllerIdentifier];
            ctl.node = [rowItem objectForKey:kNode];
            [self.navigationController pushViewController:ctl animated:YES];
        } else {
            @try {
                [self performSegueWithIdentifier:segueIdentifier sender:rowItem];
            }
            @catch (NSException *exception) {
                NSLog(@"NSException : performSegueWithIdentifier : %@", exception);
            }
        }
    }
    [tableView deselectRowAtIndexPath:indexPath animated:YES];
}
前述で書いた通り、manualの再帰的なSegueはStoryboardで定義できないので、手動でnavigationControllerにpushします。具体的にSegueIdentifierが"menuSegue"の場合にStoryboardからFMMenuViewControllerをインスタンス化し、次画面用のNode情報を設定してpushします。
            UIStoryboard *storyboard = [UIStoryboard storyboardWithName:@"Main" bundle:nil];
            FMMenuViewController *ctl = [storyboard instantiateViewControllerWithIdentifier:@"menu"];
            ctl.node = [rowItem objectForKey:kNode];
            [self.navigationController pushViewController:ctl animated:YES];
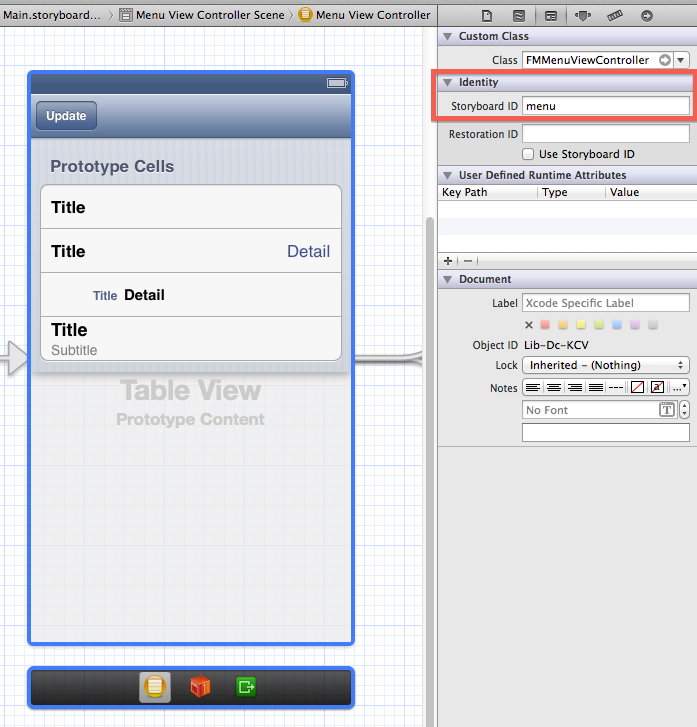
この際、FMMenuViewControllerのStoryboard IDが必要になるので、StoryboardでIDを"menu"と振っておきます。
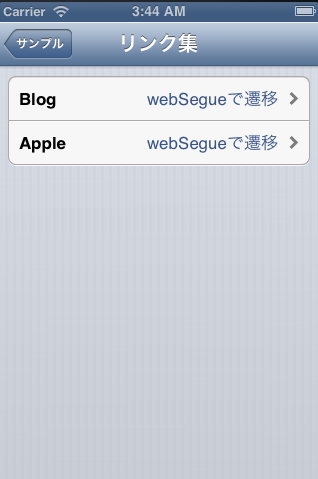
対象のセルを選択時、Menu.plistのSegueIdentifierで定義したIDを読込んでStoryboardのLeafのSegueを呼び出します。
この時にSegueIdentifierがStoryboard上に存在しない場合、例外が発生しますのでcatchするようにします。
            @try {
                [self performSegueWithIdentifier:segueIdentifier sender:rowItem];
            }
            @catch (NSException *exception) {
                NSLog(@"NSException : performSegueWithIdentifier : %@", exception);
            }
UIViewController#prepareForSegue:sender: は performSegueWithIdentifier:でSegueが起動する直前に呼び出されます。prepareForSegueではLeafへのパラメータを渡しの処理を記述します。prepareForSegueのsenderはperformSegueWithIdentifier:発行時のsenderが渡されます。ここではrowItemが渡されます。
- (void)prepareForSegue:(UIStoryboardSegue *)segue sender:(id)sender {
    FMViewController *viewController = segue.destinationViewController;
    [viewController setNode:[sender objectForKey:kNode]];
}
FMViewController.h
@interface FMViewController : UIViewController {
    NSDictionary *_node;
}
@property (strong, nonatomic) NSDictionary *node;
@end
FMViewController.m
@implementation FMViewController
@synthesize node = _node;

- (void)viewDidLoad {
    [super viewDidLoad];
    if (self.node) {
        self.title = [self.node objectForKey:kTitle];
    }
}
FMViewControllerのような全Leafの基底クラスを準備しすると、FMMenuViewControllerと各LeafのControllerは疎結合とすることができます。
Menu.plistの読込処理
FMMenuViewControllerのnodeがnilの場合は現画面がルートメニューであると判断します。viewDidLoadでローカルのDocumentディレクトリにMenu.plistが存在するかチェックし、存在すればNSDictionary#dictionaryWithContentsOfFile: で読み込みます。
    NSString *docPath = [NSSearchPathForDirectoriesInDomains(NSDocumentDirectory, NSUserDomainMask, YES) lastObject];
    NSString *filepath = [docPath stringByAppendingPathComponent:@"Menu.plist"]
    if ([[NSFileManagerdefaultManager] fileExistsAtPath:filepath]) {
        //load local file
        self.node = [[NSDictionarydictionaryWithContentsOfFile:filepath] objectForKey:kNode];
    }
Menu.plistが存在しなければサーバにリクエストを発行します。NSDictionary#dictionaryWithContentsOfURL:でも簡単に読込できるのですが、このメソッドは同期処理であることとタイムアウトが検知できないため避けるべきだと思います。(※通信中はフリーズしてしまう)
iOS5からNSURLConnection#sendAsynchronousRequest:queue:completionHandler:という簡単に非同期処理が行えますのでこちらを使います。Menu.plistのパースにはiOS5から標準で追加されたNSJSONSerializationが便利そうなのでこちらを利用します。
- (void)requestData {

    NSURL *url = [NSURL URLWithString:kRequestUrl];
    NSURLRequest *request = [NSURLRequest requestWithURL:url
                                             cachePolicy:NSURLRequestReloadIgnoringLocalCacheData
                                         timeoutInterval:10.0f]; //timeout 10 seconds

    //indicator start
    [self.indicator startAnimating];

    __block FMMenuViewController *weakSelf = self;
    [NSURLConnection
     sendAsynchronousRequest:request
     queue:[[NSOperationQueue alloc] init]
     completionHandler:^(NSURLResponse *response, NSData *data, NSError *error) {
         //indicator stop
         [weakSelf.indicator performSelectorOnMainThread:@selector(stopAnimating)
                                              withObject:nil
                                           waitUntilDone:YES];
         if (!error) {
             //parse JSON format
             NSDictionary *root = [NSJSONSerialization JSONObjectWithData:data
                                                                  options:NSJSONReadingAllowFragments
                                                                    error:nil];
             //write local file
             [root writeToFile:[weakSelf documentFilepath] atomically:YES];

             weakSelf.node = [root objectForKey:kNode];
             [weakSelf performSelectorOnMainThread:@selector(refreshData:)
                                        withObject:nil
                                     waitUntilDone:YES];
         }
     }];
}

- (void)refreshData:(id)sender {
    self.title = [_node objectForKey:kTitle];
    [self.tableView reloadData];
}
読み込んだパース済みのrootはNSDictorary#writeToFile:atomicallyで次回用にローカルファイルに書き込みます。
completionHandler:ブロックは応答があった時の処理ですが、ここは非同期スレッドで動作するのでUI処理はメインスレッドに同期させるようにします。また、循環参照リークを引き起こす可能性があるのでブロック内部から外部の変数へ直接アクセスしないように注意します。
Xcodeで作成したplistはxmlフォーマットなのですが、MacOSにはplutilコマンドが用意されており、xml <-> jsonの変換は可能です。
http://azu.github.com/2012/09/18/plist-to-json-to-objective-c-literal/
Menu.plistをMenu.jsonに変換
$ plutil -convert json -o Menu.json Menu.plist
XMLReader
参考までに、JSONじゃなくてXMLをそのまま扱いたい場合は、サードパーティライブラリでXMLReaderというものが便利に使えそうです。MIT Licenseで提供されています。(※著作権表示および許諾表示義務のみ)
https://github.com/Insert-Witty-Name/XML-to-NSDictionary
参考)http://www.zero4racer.com/blog/371
サンプルコード
サンプルコードをgithubにアップしました。
https://github.com/hmori/FlexibleMenuSample
このサンプルコードはソース上に固有の情報を持たないシンプルな作りになっています。梱包されているMenu.plistは構造のサンプルで、実際にはソース上から参照していません。動作するMenu.plistはFMMenuViewController.mのkRequestUrlのjsonファイルになります。
この方法を使えばAppStore審査通過後に隠し機能を有効にするというイースターエッグが埋め込めますが、ディベロッパー規約違反になりますのでご注意を。
