Qdmailコンポーネントを使って、GmailのSMTPサーバよりメールを送信する
独自にSMTPサーバを用意していない状況下でCakePHPでメール配信プログラムを実装しようと思っています。で、GmailのSMTPサーバを使おうとしたんですが、ハマったのでメモしておきます。
コントローラ
メール送信処理は、複数のコントローラで呼び出す可能性があるので、AppControllerクラスにメール用のパラメータを設定しておきます。
app/app_controller.php
<?php
class AppController extends Controller {
	// (中略)
	var $mail_param = array(
			'host'     => 'ssl://smtp.gmail.com', // メールサーバー
			'port'     => 465 , // SMTP over SSL
			'from'     => '*******@gmail.com',  // Return-path:
			'protocol' => 'SMTP_AUTH',
			'user'     => '*******@gmail.com', // Gmailのメールアドレス
			'pass'     => '********', // Googleのアカウントのパスワード
	);
}
上記の設定では、以下の2点に注意します。
app/controllers/mail_controller.php
<?php
class ExamplesController extends AppController {
	// (中略)
	var $components = array('Qdmail');
	function send() {
		$this->Qdmail->smtp(true);
		$this->Qdmail->smtpServer($this->mail_param);
		$this->Qdmail->to('somebody@example.com', 'サンプル太郎さん');
		$this->Qdmail->subject('Qdmail on CakePHP メールサンプル');
		$this->Qdmail->from('*******@gmail.com', 'サンプルメール配信');
		$text = 'こんにちは!メール配信テストです。';
		$this->Qdmail->text($text);
		$this->Qdmail->send();
	}
}
動作確認
http://localhost/examples/send にアクセスして、メールが送信されることを確認します。
yumで特定のパッケージをグループ単位でインストールする
yumで特定のパッケージをグループ単位でインストールしたい場合、1つ1つ指定してインストールは面倒。そういう時は、 yum groupinstallを使うと楽みたい。
具体的に、例えば X Windows System がインストールをしたい場合だと、たったこれだけでいいみたい。
$ sudo yum groupinstall "X Window System"
逆に削除したい場合には、以下のコマンドで削除ができる。
$ sudo yum groupremove "X Window System"
ちなみにどんなグループがあるのか確認したい場合には、以下のコマンドで確認ができる。
$ yum grouplist
今までOSセットアップ後にそういうグループ単位でインストールする機械がなかったので、知らなかったけど、これは楽だ。
ターミナルでMAMP版MySQLに接続する方法
そのまま接続すると以下のエラーが表示されてしまう。
$ mysql
ERROR 2002 (HY000): Can't connect to local MySQL server through socket '/opt/local/var/run/mysql5/mysqld.sock' (2)
その場合には明示的にMAMP版MySQLのSocketを指定してあげるとよい。
$ mysql -S /Applications/MAMP/tmp/mysql/mysql.sock
ただ、毎回毎回MySQLに接続するたびにSocketを指定するのは面倒なので、~/my.cnfの以下の指定を入れておく。
[client]
socket = /Applications/MAMP/tmp/mysql/mysql.sock
Apache2.2 on CentOS 5.5でfaviconを見えるように設定する
設定方法
CentOS 5.5では、favicon.icoを設置したとしても、そのままだと.icoファイルはデフォルトのMIMEタイプとしてtext/plainとして扱われます(/etc/httpd/conf/httpd.confのDefaultTypeに記載されています)。
Apacheの設定ファイル(httpd.conf)内でMIMEタイプのマッピングの設定は、以下のファイルを参照していることが分かります。
TypesConfig /etc/mime.types
ということで、上記の設定ファイル(/etc/mime.types)に.icoファイル向けのMIMEタイプを追記すればよさそうです。
image/vnd.microsoft.icon ico
ただし、サーバのリプレイスなどが発生した際に設定し忘れる可能性が高いので、Apacheの設定ファイル(httpd.conf)に以下の1行を追記する方がオススメです。
AddType image/vnd.microsoft.icon .ico
また以下のMIMEタイプを指定すると書かれているサイトもありますが、これらは全て間違ったMIMEタイプ(IANAに登録された標準的なMIMEタイプではない)を指定していますので注意して下さい。
jQuery UI Autocompleteのサンプル
jQuery UIを使って、Autocompleteのサンプルを作ってみた。
jQuery UIは、以下よりダウンロードします。
まずはサーバとの通信を必要としない単純な形(HTMLファイル内にデータがある場合)だとこんな感じ。
<html>
<head>
	<meta http-equiv="Content-Type" content="text/html; charset=utf-8" />
	<title>jQuery UI Autocomplete sample 1</title>
	<link rel="stylesheet" type="text/css" href="/css/ui-lightness/jquery-ui-1.8.5.custom.css" />
	<script type="text/javascript" src="/js/jquery-1.4.2.min.js"></script>
	<script type="text/javascript" src="/js/jquery-ui-1.8.5.custom.min.js"></script>
</head>
<body>
	<h1>jQuery UI Autocomplete sample 1</h1>
	<script type="text/javascript">
		$(function() {
			var availableArtists = [
				"Annihilator",
				"Anthrax",
				"Dark Angel",
				"Death Angel",
				"Destruction",
				"Evile",
				"Exodus",
				"Forbidden",
				"Hatesphere",
				"Kreator",
				"Megadeth",
				"Metallica",
				"Nuclear Assault",
				"Outrage",
				"Overkill",
				"Possessed",
				"Raven",
				"Ritual Carnage",
				"S.O.D.",
				"Sepultura",
				"Slayer",
				"Sodom",
				"Suicidal Tendencies",
				"Terror 2000",
				"Testament",
				"The Haunted",
				"Venom",
				"Voivod"
			];
			$("#artists").autocomplete({source: availableArtists})
				.autocomplete('option', 'minLength', 2);
		});
	</script>
	<div class="sample">
		<div class="ui-widget">
			<label for="artists">アーティスト名: </label>
			<input id="artists">
		</div>
	</div>
</body>
</html>
次にサーバとの通信を行ってデータを動的に取得する場合は、以下のようにAPIを呼び出します。
<html>
<head>
	<meta http-equiv="Content-Type" content="text/html; charset=utf-8" />
	<title>jQuery UI Autocomplete sample 2</title>
	<link rel="stylesheet" type="text/css" href="/css/ui-lightness/jquery-ui-1.8.5.custom.css" />
	<script type="text/javascript" src="/js/jquery-1.4.2.min.js"></script>
	<script type="text/javascript" src="/js/jquery-ui-1.8.5.custom.min.js"></script>
</head>
<body>
	<h1>jQuery UI Autocomplete sample 2</h1>
	<script type="text/javascript">
		$(function() {
			$('#artists').autocomplete({source : 'http://localhost:8888/search_artists.php'})
				.autocomplete('option', 'minLength', 2);
		});
	</script>
	<div class="sample">
		<div class="ui-widget">
			<label for="artists">アーティスト名: </label>
			<input id="artists">
		</div>
	</div>
</body>
</html>
呼び出されるAPI(PHPプログラム)は、配列内のデータを検索して該当するデータを返しているだけです。
<?php
	$term = $_GET['term'];
	$artists = array(
		"Annihilator",
		"Anthrax",
		"Dark Angel",
		"Death Angel",
		"Destruction",
		"Evile",
		"Exodus",
		"Forbidden",
		"Hatesphere",
		"Kreator",
		"Megadeth",
		"Metallica",
		"Nuclear Assault",
		"Outrage",
		"Overkill",
		"Possessed",
		"Raven",
		"Ritual Carnage",
		"S.O.D.",
		"Sepultura",
		"Slayer",
		"Sodom",
		"Suicidal Tendencies",
		"Terror 2000",
		"Testament",
		"The Haunted",
		"Venom",
		"Voivod"
	);
	$data = array();
	if (!empty($term)) {
		foreach ($artists as $artist) {
			if (strpos(strtolower($artist), strtolower($term)) !== false) {
				$data[] = $artist;
			}
		}
	} else {
		$data = $artists;
	}
	echo json_encode($data);
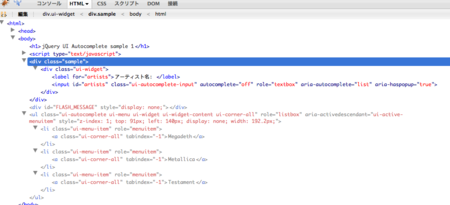
Firebugなどで見れると、タグが追加されているのが分かる。
コマンドラインで画像ファイルを操作する方法
画像ファイルに対してサムネイルを簡単に作れないかなと思ってたら、そのものズバリなコマンドがあるみたい。
例えば、foo.jpgって画像から50px×50pxのサムネイル画像を作ろうと思ったら、たったのこれだけ。
$ sips -z 75 75 foo.jpg --out foo_thumb.jpg
thumbディレクトリ以下にサムネイル画像を出力するワンライナーを書くとしたらこんな感じかな。
$ mkdir thumb
$ for file in `ls *.jpg` ; do echo "--- $file"; sips -g all $file; sips -z 75 75 $file --out thumb/$file; done
参考までにヘルプも載せておく。色々なことができるっぽい。
$ sips -h
sips 10.4.4 - scriptable image processing system.
This tool is used to query or modify raster image files and ColorSync ICC profiles.
Its functionality can also be used through the "Image Events" AppleScript suite.

  Usages:
    sips [-h, --help]
    sips [-H, --helpProperties]

    sips [image-query-functions] imagefile ...

    sips [profile-query-functions] profile ...

    sips [image modification functions] imagefile ...
         [--out result-file-or-dir]

    sips [profile modification functions] profile ...
         [--out result-file-or-dir]


  Profile query functions:
    -g, --getProperty key
    -X, --extractTag tag tagFile
    -v, --verify

  Image query functions:
    -g, --getProperty key
    -x, --extractProfile profile

  Profile modification functions:
    -s, --setProperty key value
    -d, --deleteProperty key
        --deleteTag tag
        --copyTag srcTag dstTag
        --loadTag tag tagFile
        --repair

  Image modification functions:
    -s, --setProperty key value
    -d, --deleteProperty key
    -e, --embedProfile profile
    -E, --embedProfileIfNone profile
    -m, --matchTo profile
    -M, --matchToWithIntent profile intent
        --deleteColorManagementProperties
    -r, --rotate degreesCW
    -f, --flip horizontal|vertical
    -c, --cropToHeightWidth pixelsH pixelsW
    -p, --padToHeightWidth pixelsH pixelsW
        --padColor hexcolor
    -z, --resampleHeightWidth pixelsH pixelsW
        --resampleWidth pixelsW
        --resampleHeight pixelsH
    -Z, --resampleHeightWidthMax pixelsWH
    -i, --addIcon
Linux上のSubversionリポジトリをWindows上に移動する
諸事情でLinuxサーバ上に作成したSubversionリポジトリをWindowsサーバ上に移動およびSubversionのFormatが混在しているので統一するための作業をメモしておく。
Windows環境ではTortoiseSVNを使っており、それだけではsvnadminコマンドが利用できない。
そのため別途インストールを行う必要があり、Subversionの公式サイトにバイナリパッケージのダウンロードページが用意されているので、それをインストールします。
いくつかあるようなのですが、SlikSVN を選びました。以下がダウンロードページになります。
現行で使っているTortoiseSVNのバージョン(1.5系)にあわせた方が無難なので、以下から同一のバージョンをダウンロードします。
Linux上にてsvnadmin dumpコマンドを使ってdumpします。
$ svnadmin dump /path/to/repo/example > example.dmp
Windows上で事前にリポジトリを作成した上で、svnadmin loadコマンドを使いloadします。
C:\path\to\repo> svnadmin create C:\path\to\repo\example --fs-type fsfs
C:\path\to\repo> svnadmin load C:\path\to\repo\example < example.dmp
