JR東日本東京駅ARアプリ「JR×AR」使用レポート
2012年4月16日〜2012年6月30日まで、東京駅構内で実験的に実施されている、駅構内をAR(拡張現実)を用いて案内する「JR×AR」を早速ためしてきました。
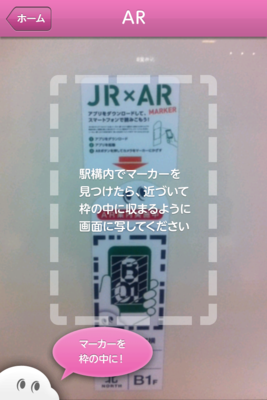
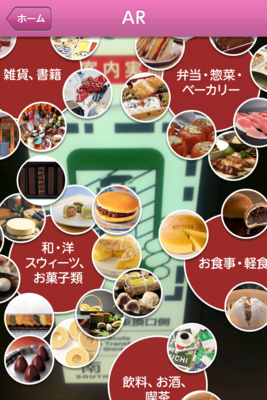
実験の概要としては、独自のマーカーをスマートフォンのカメラで写し、その場所に適したコンテンツを表示させるというものです。
公式サイト:http://www.jrar.jp/
感想としては、「今後に期待」と言ったところです。
AR(拡張現実)をどの様に解釈するかによると思いますが、今回の実験ではARの特性を活かしきれていないと感じました。
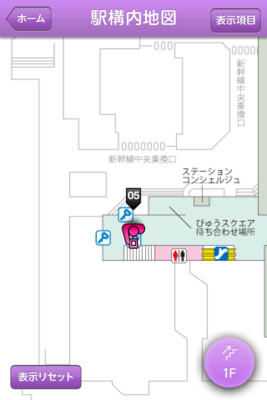
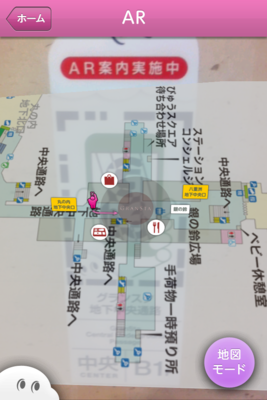
と言うのも、マーカーを読み取り表示されるコンテンツが、現在地と方向が記載された静的な地図だったりします(読み取るマーカーによって表示されるコンテンツが異なります)。これだとARというより、マーカーの読み取り実験と言った方が適切な様に感じます。
また、独自のマーカーを使用していますが、既に一般に広く認知されているQRコードでは何故いけなかったのかも、疑問に感じる点です。
とはいえ、まだまだ実験段階なので、今後の壮大なストーリーの序章なのかも知れません。東京駅に立ち寄る予定があり、スマートフォンをお持ちなら、試して見て下さい。Android版とiPhone版のアプリが供給されています。
執筆者:中の人A
Androidでグラフを表示する方法
今回は、Androidでグラフを表示する方法について、ご紹介します。
グラフ表示を0から作成することも出来ますが、グラフ作成ライブラリを使用する方が簡単です。
Androidで使用できるグラフ作成ライブラリは、下記のようなものがあります。
AFreeChart
AChartEngin
ChartDroid
今回は「AFreeChart」を使用したグラフ作成方法についてです。
「AFreeChart」は有名なJava用グラフ作成ライブラリ「JFreeChart」をAndroid用にカスタマイズしたライブラリです。全てではありませんが、「AFreeChart」を使用していて困った場合は、「JFreeChart」の情報も役に立ちます。<手順概要>
1.ライブラリ(jarファイル)の取得
2.ライブラリをEclipseのプロジェクトに追加(ビルドパスを通す)
3.ライブラリを使用してグラフを作成する<手順詳細>
1.ライブラリ(jarファイル)の取得
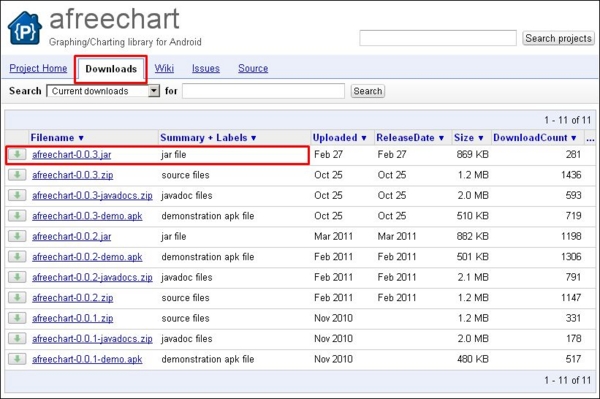
リンク先のWebページ上で、【downloads】タグを選択し、リストの中から最新のjarファイルをクリックする。(下図参照)
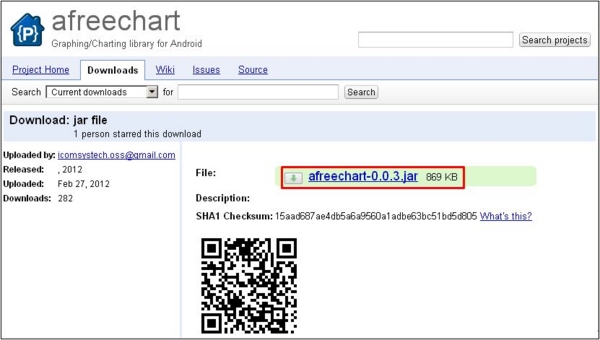
表示されたページ上でファイル名をクリックすると、ダウンロードが始まります。(下図参照)
適当な場所に保存して下さい。
2.ライブラリをEclipseのプロジェクトに追加(ビルドパスを通す)
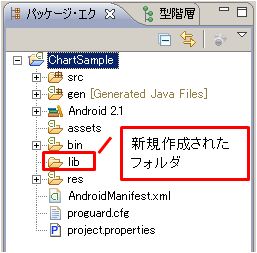
2-1.ライブラリファイルを格納するフォルダの作成
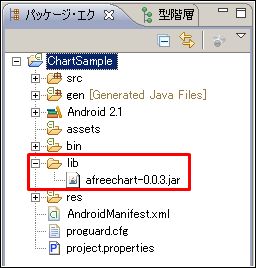
グラフを表示したいプロジェクトをEclipse上で右クリックし、[新規(W)]→[フォルダ]をクリックする。
表示されたダイアログのフォルダ名に「lib」と入力し、【完了】ボタンを押下する。
(フォルダ名は任意の名前で良いですが、慣習的に「lib」とすることが多いです)
2-2.ライブラリファイルの格納
2-1で作成したlibフォルダに、1でダウンロードしたjarファイルを、ドラック&ドロップする。
2-3.ビルドパスを通す
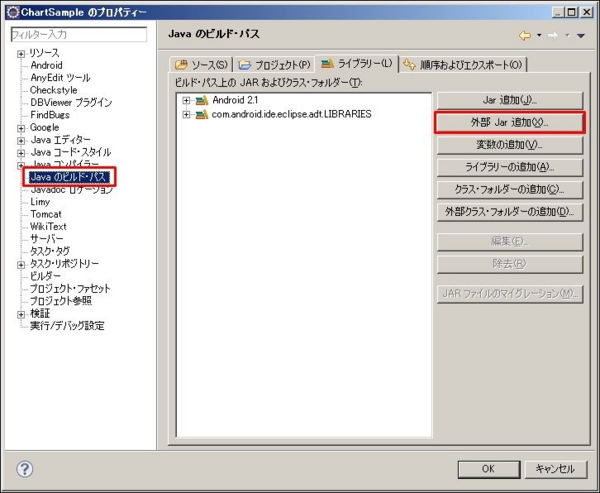
プロジェクトを右クリックし、[プロパティ(R)]をクリックする。
表示されるダイアログの左部分で、「Javaのビルド・パス」を選択する。
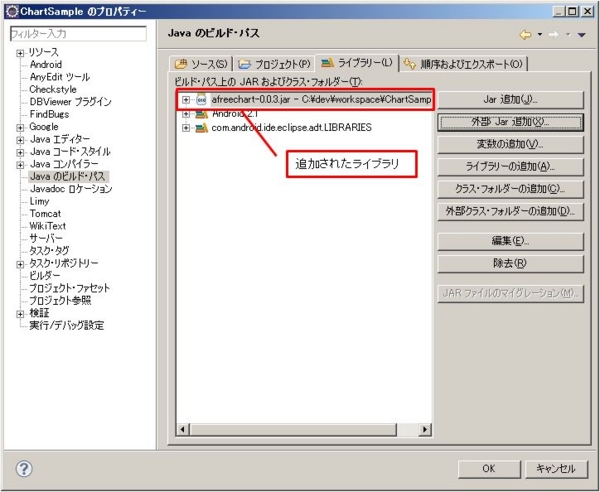
【ライブラリ(L)】の【外部Jar追加】ボタンを押下する。
表示されたダイアログで、2-2で格納したライブラリファイルを指定する。
3.ライブラリを使用してグラフを作成する
3-1.グラフを表示するためのViewクラスを作成する
下記は450×450の表示領域を持つグラフ表示用のViewクラスのサンプルコードです。
public class ChartView extends View {

    private AFreeChart chart;

    public ChartView(Context context, AttributeSet attrs) {
        super(context, attrs);
    }

    @Override
    protected void onDraw(Canvas canvas) {

        super.onDraw(canvas);
        RectShape chartArea = new RectShape(0.0, 0.0, 450.0, 450.0);
        this.chart.draw(canvas, chartArea);

    }

    public void setChart(AFreeChart chart) {
        this.chart = chart;
    }
}
3-2.画面レイアウト定義XMLの作成
3-1で作成したグラフ表示用のViewクラスを使用して、画面レイアウト定義XMLを作成します。
<?xml version="1.0" encoding="utf-8"?>
<LinearLayout xmlns:android="http://schemas.android.com/apk/res/android"
    android:layout_width="fill_parent"
    android:layout_height="fill_parent"
    android:orientation="vertical" >

    <jp.co.psol.ChartSample.ChartView
              android:id="@+id/chart_view"
              android:layout_margin="3dip"
              android:layout_width="wrap_content"
              android:layout_height="wrap_content" />

</LinearLayout>
3-3.グラフにするデータを作成し、AFreeChartオブジェクトを生成する
public class ChartSampleActivity extends Activity {

    @Override
    public void onCreate(Bundle savedInstanceState) {

    	super.onCreate(savedInstanceState);
        setContentView(R.layout.main);

        //グラフにするデータの作成
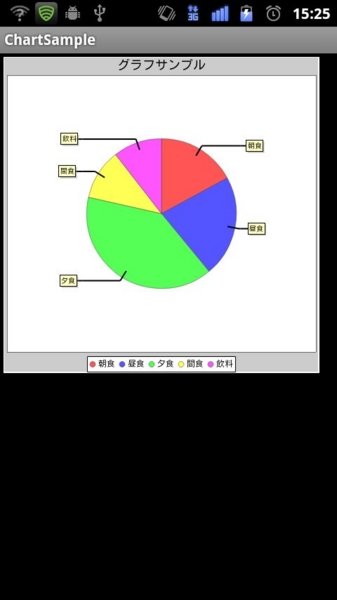
        DefaultPieDataset dataset = new DefaultPieDataset();
        dataset.setValue("朝食", new Integer(390));
        dataset.setValue("昼食", new Integer(500));
        dataset.setValue("夕食", new Integer(900));
        dataset.setValue("間食", new Integer(250));
        dataset.setValue("飲料", new Integer(240));

        //AFreeChartの作成
        AFreeChart chart = ChartFactory.createPieChart(
                "グラフサンプル",        //グラフのタイトル
                dataset,                //グラフにするデータ
                true,
                false,
                false);

        ChartView charview = (ChartView) findViewById(R.id.chart_view);
        charview.setChart(chart);
    }
}
以上です。
執筆者:中の人A
jQueryを使っていた人が注意すべきこと
こんにちは。
今日は、jQueryを使っていた人が、jQueryMobileを使う時に注意すべきこと、です。
jQueryの場合は、ページ初期化時に動かしたいコードがある時は、以下のような感じで書きます。
$(document).ready(function(){
    alert("DOM構築完了")
});
これの類推で、各ページの初期化完了時に呼び出したい処理を書こうとして、こう言うコードを書こうとすると思います。
[indexページとhogeページがあると仮定しています。]
$(document).ready(function(){
    $("#index").live("pageinit",function(){
        alert("Hello, index page.");
    });
    $("#hoge").live("pageinit",function(){
        alert("Hello, hoge page.");
    });
});
これが、思わぬ動きをして、結構はまります。
最初に表示するページがindexだとすると、"Hello, index page."のalertは表示されません。また、最初に表示するページがhogeだとすると、今度は、"Hello, hoge page."のalertは表示されません。
つまり、こう言う現象です。
- indexページ、hogeページの順に遷移した場合、"Hello, hoge page."のみが表示される。
- hogeページ、indexページの順に遷移した場合、"Hello, index page."のみが表示される。
どの順に遷移しても、両方出すには、ready()の中でバインドするのではなくて、こうします。
$("#index").live("pageinit",function(){
    alert("Hello, index page.");
});
$("#hoge").live("pageinit",function(){
    alert("Hello, hoge page.");
});
初期化時にやったつもりのことが出来てなくて困ったら、疑ってみると良いでしょう。私の場合、気付くのに結構時間が掛かりました…。
因みに、pageinitは、初期化時に一度だけ実行されます。表示の度に何かしたい時は、pageshowなどのページ切換えイベントを使います。
$("#index").live("pageshow",function(){
    alert("Hello, index page.");
});
$("#hoge").live("pageshow",function(){
    alert("Hello, hoge page.");
});
ページ切換えイベントは幾つかあります。
| イベント | 発生するページ | タイミング |
|---|---|---|
| pagebeforehide | 遷移前ページ | アニメーション実行前 |
| pagehide | 遷移前ページ | アニメーション実行後 |
| pagebeforeshow | 遷移後ページ | アニメーション実行前 |
| pageshow | 遷移後ページ | アニメーション実行後 |
です。
ready()ではなくて、pageinitを使え、と言う教訓は、本家にも書いてあります。何度も目にしていたはずなのですが、見逃していました。ドキュメントはちゃんと読みましょうね。
#何故か、表組みが上手く表示されません…。
中の人Bでした。
App Storeの審査経過報告[iCloud対応] 2
前回の記事でRejectされたアプリが、本日審査を通過し、iTunesからダウンロードできる様になりました。最寄りのカフェを地図表示する「カフェしるべ」というアプリです。よろしければ、ダウロードして下さい。
http://itunes.apple.com/jp/app/id510897503
さて今回の記事の本題は、前回の記事の続きとして、Rejectされたアプリに対して行った修正についてです。
結論から言うと、前回記事で紹介した、iOS Storage Data Guidelinesの「2.ダウンロード可能なデータは、
問題になっていたファイルは、アプリで使用するデータを格納したSQLiteのDBファイル(約2MB)でした。このファイルがアプリインストール時に、iCloudへのバックアップ対象である「
「
そこで、対応策として、AppDelegateクラスに下記の処理を追加することで、SQLiteのDBファイルを「
@implementation AppDelegate

//中略

- (BOOL)application:(UIApplication *)application didFinishLaunchingWithOptions:(NSDictionary *)launchOptions
{

    //前略

    //「<Application_Home>/Documents」に配置されているDBファイルのファイルパスを生成
    NSArray *docPaths = NSSearchPathForDirectoriesInDomains(NSDocumentDirectory, NSUserDomainMask, YES);
    NSString *docDir = [docPaths objectAtIndex:0];
    NSString *docDbPath = [docDir stringByAppendingPathComponent:@"DBファイル名"];

    //ファイルマネージャ初期化
    NSFileManager *fm = [NSFileManager defaultManager];

    //DBファイルの存在確認(存在しない場合はファイル移動実施済みと判断)
    if(![fm isExecutableFileAtPath:docDbPath]){

        //コピー先「<Application_Home>/Library/Caches」のファイルパスを生成
        NSArray *cachesPaths = NSSearchPathForDirectoriesInDomains(NSCachesDirectory, NSUserDomainMask, YES);
        NSString *cachesDir = [cachesPaths objectAtIndex:0];
        NSString *cachesDbPath = [cachesDir stringByAppendingPathComponent:@"DBファイル名"];

        NSError *error;

        //コピー先のフォルダがない場合は作成する
        if(![fm fileExistsAtPath:cachesDir]){

            [fm createDirectoryAtPath:cachesDir withIntermediateDirectories:YES attributes:nil error:&error];
        }

        //ファイルの移動実施
        [fm moveItemAtPath:docDbPath toPath:cachesDbPath error:&error];

    }

    //後略

}

//中略

@end
執筆者:中の人A
App Storeの審査経過報告[iCloud対応]
こんにちは。
New iPad出ましたね。
解像度が飛躍的に良くなってます。
アップルストア渋谷の店員さんは、解像度が良くなったことと共に、iPhotoのセールスを盛んにしてました。
さて、今回は、当社に取ってタイムリーな話題、App Storeの審査についてです。
iOSで、無料アプリを開発して、審査依頼を出したのが、丁度先週末です。噂によると、最短で3,4日程度の期間を要する、と言うことでしたが、今回は、1週間でした。
結果はと言うと…。
Hello XXX,
Your app XXXX has been reviewed, but we are unable to post this version. For details, or to directly contact the App Review team, visit the Resolution Center in iTunes Connect. Do not reply to this email.
Regards,
App Review
...(引用者略)...
要するに、駄目ってことです。
Resolution Centerに来い、と言うので、iTunes Connectにログインします。
Manage Your Applicationsに進むと、アプリの一覧が出ます。対象のアプリをクリックすると、[Review Status]とあり、以下の文言が。
The most recent version of your app has been rejected. Before resubmitting it, visit the Resolution Center for details on outstanding issues.
で、横に[Resolution Center]と言うボタンがあるので、クリックします。
Binary Rejected Mar 22, 2012 06:12 PM
Reasons for Rejection:
2.23 Apps must follow the iOS Data Storage Guidelines or they will be rejected
Mar 22, 2012 06:12 PM. From Apple.
2.23We found that your app does not follow the iOS Data Storage Guidelines, which is required per the App Store Review Guidelines.
In particular, we found that on launch and/or content download, your app stores 2.84 MB. To check how much data your app is storing:
- Install and launch your app
- Go to Settings > iCloud > Storage & Backup > Manage Storage
- If necessary, tap "Show all apps"
- Check your app's storage
The iOS Data Storage Guidelines indicate that only content that the user creates using your app, e.g., documents, new files, edits, etc., may be stored in the /Documents directory - and backed up by iCloud.
Temporary files used by your app should only be stored in the /tmp directory; please remember to delete the files stored in this location when the user exits the app.
Data that can be recreated but must persist for proper functioning of your app - or because customers expect it to be available for offline use - should be marked with the "do not back up" attribute. For NSURL objects, add the NSURLIsExcludedFromBackupKey attribute to prevent the corresponding file from being backed up. For CFURLRef objects, use the corresponding kCFURLIsExcludedFromBackupKey attribute.
For more information, please see Technical Q&A 1719: How do I prevent files from being backed up to iCloud and iTunes?.
It is necessary to revise your app to meet the requirements of the iOS Data Storage Guidelines.
For discrete code-level questions, you may wish to consult with Apple Developer Technical Support. Please be sure to prepare any symbolicated crash logs, screenshots, or steps to reproduce the issues for when the DTS engineer follows up. For information on how to symbolicate and read a crash log, please see Tech Note TN2151 Understanding and Analyzing iPhone OS Application Crash Reports.
内部で保持しているデータが無駄にiCloudにバックアップされないような処置を施しなさい、と言うことの様です。iOS Storage Data Guidelinesを読めとあるので、表示してみると4つのパターンが示されています。
1. Only documents and other data that is user-generated, or that cannot otherwise be recreated by your application, should be stored in the
/Documents directory and will be automatically backed up by iCloud.
1.ユーザが作ったデータやドキュメントは、
2. Data that can be downloaded again or regenerated should be stored in the
/Library/Caches directory. Examples of files you should put in the Caches directory include database cache files and downloadable content, such as that used by magazine, newspaper, and map applications.
2.ダウンロード可能なデータは、
3. Data that is used only temporarily should be stored in the
/tmp directory. Although these files are not backed up to iCloud, remember to delete those files when you are done with them so that they do not continue to consume space on the user’s device.
3.テンポラリーに使われるデータは、
4. Use the "do not back up" attribute for specifying files that should remain on device, even in low storage situations. Use this attribute with data that can be recreated but needs to persist even in low storage situations for proper functioning of your app or because customers expect it to be available during offline use. This attribute works on marked files regardless of what directory they are in, including the Documents directory. These files will not be purged and will not be included in the user's iCloud or iTunes backup. Because these files do use on-device storage space, your app is responsible for monitoring and purging these files periodically. Learn more
For more information read the iOS App Programming Guide.
4."ローストレージシチュエーション"(ディスクパンパン状態)でも、デバイスに残しておくべきファイルには、「do not back up」属性を設定せよ。そうすれば、バックアップの対象外になるよ、です。
Learn moreの所に、リンク Technical Q&A QA1719 が張ってありまして、[do not back up]属性の設定方法が書かれています。
#include <sys/xattr.h>
- (BOOL)addSkipBackupAttributeToItemAtURL:(NSURL *)URL
{
    const char* filePath = [[URL path] fileSystemRepresentation];

    const char* attrName = "com.apple.MobileBackup";
    u_int8_t attrValue = 1;

    int result = setxattr(filePath, attrName, &attrValue, sizeof(attrValue), 0, 0);
    return result == 0;
}
setxattrをコールして、拡張属性を設定せよ、言うことらしいです。4については、iOS 5.0.1から加わった様ですね。
取り敢えず、対応して、アップロードしなおしました。
審査待ちなので、どう対応したかは、レビュー結果が来てから記すことにします。
本日は、中の人Bが担当しました。
UIViewControllerのライフサイクル
Androidアプリの開発を書籍等で学ぶと、必ず序盤にアクティビティのライフサイクル図が出てきます。
しかし、iPhoneアプリの開発を書籍等で学んでも同等の図が出てきません。
(少なくとも執筆者が読んだ書籍には出てきませんでした)
いろいろ検索した結果、下記のサイトを発見しました。
とても有用だと思うので紹介させて頂きます。
http://www.aguuu.com/archives/2011/02/iosuiviewcontrollerlifecycle/
執筆者:中の人A
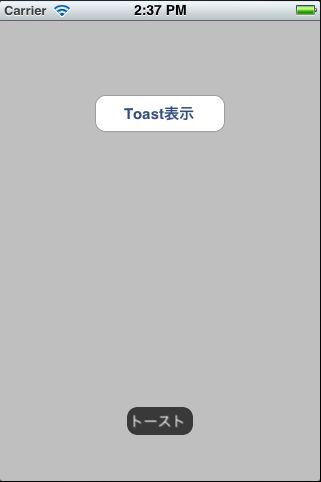
iPhoneでToastを表示する方法
Androidでは、アプリからユーザに対して、ちょっとした情報を提示するためにToastが用意されています。
しかし、iPhoneではToastに該当するものが用意されていません。
なので、iPhoneでToastのようなものを表示したい場合は、開発者が自前で準備してやる必要があります。
今回はその方法をご紹介します。
方法の概要としては、UIButtonをベースにToastぽいものを作成します。
以下にサンプルコードを記載します。
(サンプルなのでメモリ効率などは考慮していません)
#import <UIKit/UIKit.h>

@interface Toast : UIButton

-(void)initWithMessage:(NSString *)msg showTime:(float)sec parentView:(UIView *)parentview;
-(void)tapToast;

@end
#import <QuartzCore/QuartzCore.h>
#import "Toast.h"

@implementation Toast

-(void)initWithMessage:(NSString *)msg showTime:(float)sec parentView:(UIView *)parentview{

    UIFont *font = [UIFont systemFontOfSize:14];
    CGSize textSize = [msg sizeWithFont:font constrainedToSize:CGSizeMake(300, 50)];

    //ラベルの生成
    UILabel *label = [[UILabel alloc] initWithFrame:CGRectMake(0, 0, textSize.width + 5, textSize.height + 5)];
    label.backgroundColor = [UIColor clearColor];
    label.textColor = [UIColor whiteColor];
    label.font = font;
    label.text = msg;
    label.numberOfLines = 0;
    label.shadowColor = [UIColor darkGrayColor];
    label.shadowOffset = CGSizeMake(1, 1);

    // toast として使うボタンの生成
    self = [Toast buttonWithType:UIButtonTypeCustom];
    self.frame = CGRectMake(0, 0, textSize.width + 10, textSize.height + 10);
    label.center = CGPointMake(self.frame.size.width / 2, self.frame.size.height / 2);

    // label をボタンに登録する
    [self addSubview:label];

    //背景色の設定
    self.backgroundColor = [UIColor colorWithRed:0 green:0 blue:0 alpha:0.7];

    //角を丸くする設定
    [[self layer] setCornerRadius:10.0];
    [self setClipsToBounds:YES];

    CGPoint point = CGPointMake(parentview.frame.size.width/2, parentview.frame.size.height/2);
    point = CGPointMake(parentview.frame.size.width / 2, parentview.frame.size.height - 60);
    point = CGPointMake(point.x, point.y);
    self.center = point;

    //トーストがタップされた場合は非表示にする
    [self addTarget:self action:@selector(tapToast) forControlEvents: UIControlEventTouchDown];

    //親画面に追加する
    [parentview addSubview:self];

    //タイマーにより自動的に非表示にする
    [NSTimer scheduledTimerWithTimeInterval:sec target:self selector:@selector(tapToast) userInfo:nil repeats:NO];

}

-(void)tapToast{

    self.hidden = YES;
    self = nil;
}

@end
※「#import
#import "ViewController.h"
#import "Toast.h"

@implementation ViewController

-(IBAction)tapButton{

    //「トースト」と1.5秒間表示される
    [[Toast alloc] initWithMessage:@"トースト" showTime:1.5 parentView:self.view];

}

//中略

@end
Toastを表示したいときは、上記の様に1行で記述することができます。
執筆者:中の人A
