ちょっとMICRONAUTを試してみた
Spring Boot以外でJavaでWebアプリを作成する時に簡単に使用できそうなのでちょっと実装
(View側でthymeleaf 以外を使用したかったので)
- まずinstall
詳細は
Download | Micronaut Framework
sdk install micronaut
mn --version

すごく簡単
- アプリ作成
mn create-app hello-world
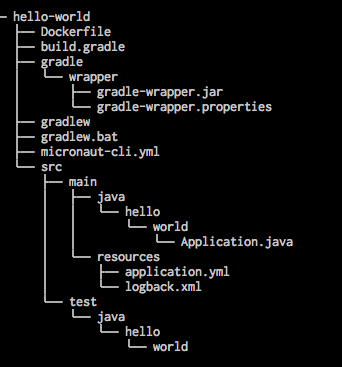
以下の構成でファイルが作成されている
- Controllerを追加
HelloController.java
package hello.world;

import io.micronaut.http.MediaType;
import io.micronaut.http.annotation.Controller;
import io.micronaut.http.annotation.Get;
import io.micronaut.http.annotation.Produces;

@Controller("/hello")
public class HelloController {
    @Get(uri= "/{name}")
    @Produces(MediaType.TEXT_PLAIN)
    public String index(String name){
        return "Hello " + name;
    }
}
HelloByHtmlController.java
package hello.world;

import io.micronaut.http.MediaType;
import io.micronaut.http.annotation.Controller;
import io.micronaut.http.annotation.Get;
import io.micronaut.http.annotation.Produces;

@Controller("/hellohtml")
public class HelloByHtmlController {
    @Get("/{name}")
    @Produces(MediaType.TEXT_HTML)
    String hello(String name){
        return xxx(name);
    }
    String xxx(String name) {
        return "<html><title><h1>HTML</h1></title><body>Hello " + name + "</body></html>";
    }
}
起動はgradleで
./gradlew run
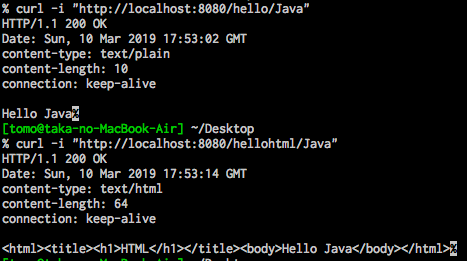
curl -i "http://localhost:8080/hello/Java"
curl -i "http://localhost:8080/hellohtml/Java"
詳細は、以下に記載していてとてもわかりやすいです!
docs.micronaut.io
Java11 with Spring Boot2.1
Showing Japanese era
I just want to try if Spring Boot 2.1 works with Java11.
It is very easy, I do not have to do anything special without module-info.java.
I will try to use module-info.java next time. :-)
Result1

Result2

Spring Boot 2.1.2
build.gradle
buildscript {
	ext {
		springBootVersion = '2.1.2.RELEASE'
	}
	repositories {
		mavenCentral()
	}
	dependencies {
		classpath("org.springframework.boot:spring-boot-gradle-plugin:${springBootVersion}")
	}
}

apply plugin: 'java'
apply plugin: 'org.springframework.boot'
apply plugin: 'io.spring.dependency-management'

group = 'com.example'
version = '1.0.0'
sourceCompatibility = '1.11'
targetCompatibility = '1.11'

repositories {
	mavenCentral()
}

dependencies {
	implementation 'org.springframework.boot:spring-boot-starter-actuator'
	implementation 'org.springframework.boot:spring-boot-starter-thymeleaf'
	implementation 'org.springframework.boot:spring-boot-starter-web'
	compileOnly 'org.projectlombok:lombok:1.18.4'
	runtimeOnly 'org.springframework.boot:spring-boot-devtools'
	testImplementation 'org.springframework.boot:spring-boot-starter-test'
}
Gradle
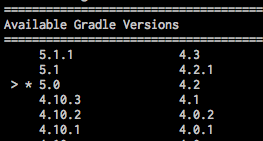
use gradle5
Setting for IDEA
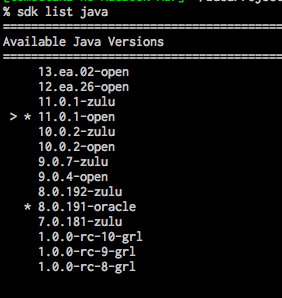
Can not select .sdl directory, so drag and drop .sdkman/candidates


Code without module-info.java
package com.example.japanesedatesample.controller;

import lombok.extern.slf4j.Slf4j;
import org.slf4j.Logger;
import org.slf4j.LoggerFactory;
import org.springframework.stereotype.Controller;
import org.springframework.ui.Model;
import org.springframework.util.StringUtils;
import org.springframework.web.bind.annotation.PostMapping;
import org.springframework.web.bind.annotation.RequestMapping;

import java.time.LocalDate;
import java.time.LocalDateTime;
import java.time.chrono.JapaneseDate;
import java.time.format.DateTimeFormatter;
import java.util.Optional;

@Slf4j
@Controller
public class JapaneseDateController {
    private static Logger logger = LoggerFactory.getLogger(JapaneseDateController.class);

    @RequestMapping("/")
    public String home() {
        return "test";
    }

    @PostMapping("/show")
    public String show(String inDate, Model model) {
        logger.info("show inDate=[{}]", inDate);
        if (StringUtils.isEmpty(inDate)) {
            model.addAttribute("japaneseDate", "???");
        } else {
            var formatter = DateTimeFormatter.ofPattern("yyyy-MM-dd");
            var localDate= LocalDate.parse(inDate, formatter);
            logger.info("localDate=[{}]", localDate);
            var japaneseDate = JapaneseDate.from(localDate);
            model.addAttribute("japaneseDate", japaneseDate);
        }
        model.addAttribute("inDate", inDate);
        return "test";
    }
}
code on Github
Spring Boot Session Sample
2018-01-08, Spring Boot Version 1.5.9時点
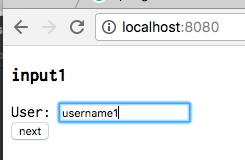
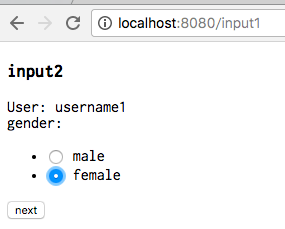
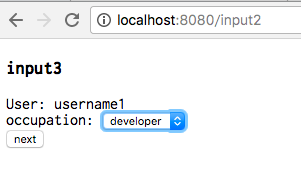
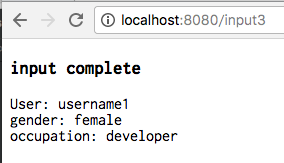
Spring Boot を使って、input1,input2,input3,input complete画面で、user sessionを共有する処理を実装してみました。
Spring Boot すごく簡単です!
画面遷移のイメージ
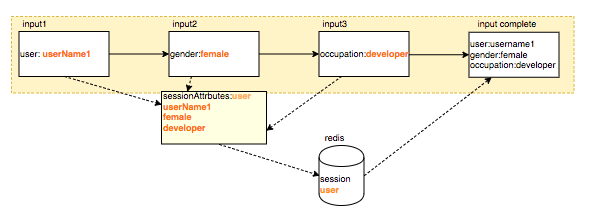
各controllerに「@SessionAttributes("user")」を実装するだけで、ModelAttribute("user")に登録しているuser attributeがsession管理されます
input1Controller.java
@Controller
@SessionAttributes("user")  // *** ここでsession管理するattributeを指定
public class Input1Controller {
    private static final Logger logger = LoggerFactory.getLogger(Input1Controller.class);
    @ModelAttribute("genders")
    public List<String> genders() {
        return Arrays.asList("male", "female");
    }
    @PostMapping("/input1")
    public String input1(@ModelAttribute("user") User user) {
        logger.info("start input1 method user=[{}]", user.toString());
        return "input2";
    }
}
session をRedisに保存するために「@EnableRedisHttpSession」annotationを追加するだけです
@SpringBootApplication
@EnableRedisHttpSession  // *** Redisを使ってsession管理するために指定
public class RedisSessionSampleApplication {
    public static void main(String[] args) {
        SpringApplication.run(RedisSessionSampleApplication.class, args);
    }
}
Redis
Redisは、dockerを使って起動しておきます
docker-compose -f docker/docker-compose.yml up
Spring Boot Zuul Sample
前回Spring Boot Hystrix Sample - tomoTaka’s blog
までのSpring Boot Eureka, Ribbon, HystrixにZuul Proxyの機能を追加してみました。
イメージは、こんか感じかな?

serviceをcall
curl "http://localhost:8888/sample/zuulwork"
backend serviceが正常な場合
zuul work done. from server port is [8001]
backend serviceが停止していた(異常)な場合
zuul work failed. due to [Load balancer does not have available server for client: greeting-service]
backend service(ZuulWorkServiceController.java)
@RestController
public class ZuulWorkServiceController {
    private static final Logger logger = LoggerFactory.getLogger(ZuulWorkServiceController.class);
    @Value("${server.port}")
    private int port;

    @RequestMapping("zuulwork")
    public String zuulwork() {
        String greeting = String.format("zuul work done. from server port is [%d]", port);
        return greeting;
    }
}
zulu setting(application.yml)
zuul:
  ignoredServices: '*'
  routes:
    works:
      path: /zuulwork
      serviceId: greeting-service
front component for circuit breaker(WorkFallback.java)
ZuulFallbackProviderは、非推奨になっていました。
それとgetRouteで、特定のroute[works]を指定しても聞かなかったので、全部*を対象にしています。
@Component
public class WorkFallback implements FallbackProvider {
    @Override
    public ClientHttpResponse fallbackResponse(Throwable cause) {
        ClientHttpResponse response = new ClientHttpResponse() {
            @Override
            public HttpStatus getStatusCode() throws IOException {
                return HttpStatus.OK;
            }

            @Override
            public int getRawStatusCode() throws IOException {
                return HttpStatus.OK.value();
            }

            @Override
            public String getStatusText() throws IOException {
                return "Ok";
            }

            @Override
            public void close() {

            }

            @Override
            public InputStream getBody() throws IOException {
                return new ByteArrayInputStream(("zuul work failed. due to [" + cause.getMessage() + "]").getBytes());
            }

            @Override
            public HttpHeaders getHeaders() {
                HttpHeaders httpHeaders = new HttpHeaders();
                httpHeaders.setContentType(MediaType.TEXT_PLAIN);
                return httpHeaders;
            }
        };
        return response;
    }

    @Override
    public String getRoute() {
        return "*";
//        return "works";
    }
...
}
Front Application(EurekaFeignApplication.java)
@SpringBootApplication
@EnableCircuitBreaker
@EnableZuulProxy  // 追加
public class EurekaFeignApplication {

    public static void main(String[] args) {
        SpringApplication.run(EurekaFeignApplication.class, args);
    }
}
Spring Boot Cloudいろいろ楽しいです!
Spring Boot Hystrix Sample
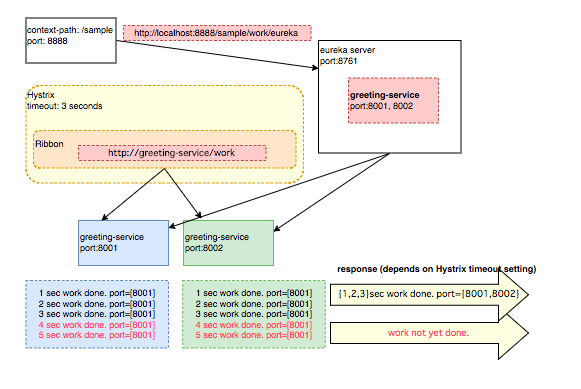
昨日までの、Spring Cloud Eureka server, service discovery, Ribbon に今回はHystrix(Circuit Breaker)を追加してみました。
tomotaka.hatenablog.com
イメージは、こんな感じかな?
work service
1,2,3,4 and 5秒かかるサービスのapi(port:8001,8002 で公開)
package com.example.eurekaclinet.controller;

import org.slf4j.Logger;
import org.slf4j.LoggerFactory;
import org.springframework.beans.factory.annotation.Value;
import org.springframework.web.bind.annotation.RequestMapping;
import org.springframework.web.bind.annotation.RestController;

import java.util.Random;
import java.util.concurrent.TimeUnit;

@RestController
public class WorkServiceController {
    private static final Logger logger = LoggerFactory.getLogger(WorkServiceController.class);
    @Value("${server.port}")
    private int port;
    private Random random = new Random();

    @RequestMapping("/work")
    public String work() {
        int i = random.nextInt(5) + 1;
        logger.info("start work with {} sec", i);
        try {
            TimeUnit.SECONDS.sleep(Long.valueOf(i));
        } catch (InterruptedException e) {
            logger.error("work error", e);
            throw new RuntimeException(e.getMessage());
        }
        String work = String.format("%d sec work done. port=[%d]", i, port);
        return work;
    }
}
call work service
sample アプリが、上記のapiをcall
@ HystrixCommand annotationで、タイムアウト3100 millisecを設定しているので、4,5秒の処理では、レスポンスがfallbackMethodメソッドで設定している固定値「work not yet done.」を返却。
package com.example.eurekafeign.controller;

import com.netflix.hystrix.contrib.javanica.annotation.HystrixCommand;
import com.netflix.hystrix.contrib.javanica.annotation.HystrixProperty;
import org.slf4j.Logger;
import org.slf4j.LoggerFactory;
import org.springframework.beans.factory.annotation.Autowired;
import org.springframework.web.bind.annotation.RequestMapping;
import org.springframework.web.bind.annotation.RestController;
import org.springframework.web.client.RestTemplate;

@RestController
public class WorkController {
    private static final Logger logger = LoggerFactory.getLogger(WorkController.class);
    @Autowired
    private RestTemplate restTemplate;

    @RequestMapping("/work/eureka")
    @HystrixCommand(fallbackMethod = "workFallback", commandProperties = {
            @HystrixProperty(name = "execution.isolation.thread.timeoutInMilliseconds", value = "3100")
    })
    public String work() {
        logger.info("start work from eureka");
        String work = restTemplate.getForObject("http://greeting-service/work", String.class);
        logger.info("end work from eureka");
        return work;
    }

    public String workFallback() {
        return "work not yet done.";
    }
}
Dashboard
まだ見かたがよくわかっていませんが、、、

タイムアウトの他にもHysteriaは、いろいろ設定できるよう。
まだまだ、勉強することが山積みです(汗)
コードは、アップ
github.com
Spring Boot Ribbon Sample with Eureka
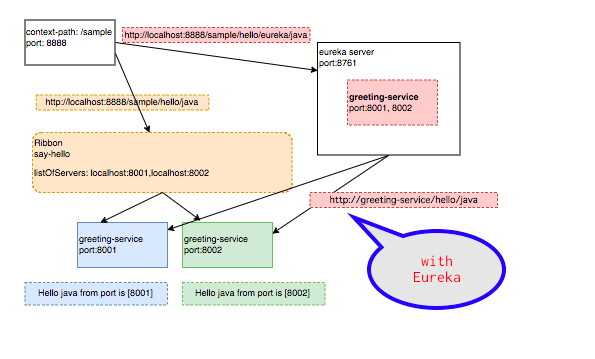
昨日のRibbon のsampleは、Eureka service discoveryを使っていないので、ちょっと修正して、Eureka service discoveryを使用。
こっちのほうが、設定は少なくて簡単でした。
イメージ図
SayHelloEurekaController.java
以下の2箇所だけ修正
package com.example.eurekafeign.controller;

import org.springframework.beans.factory.annotation.Autowired;
import org.springframework.cloud.client.loadbalancer.LoadBalanced;
import org.springframework.context.annotation.Bean;
import org.springframework.web.bind.annotation.PathVariable;
import org.springframework.web.bind.annotation.RequestMapping;
import org.springframework.web.bind.annotation.RestController;
import org.springframework.web.client.RestTemplate;

@RestController
public class SayHelloEurekaController {
    @Autowired
    private RestTemplate restTemplate;

    @Bean
    @LoadBalanced   // 1. add @LoadBalanced annotation
    RestTemplate restTemplate() {
        return new RestTemplate();
    }

    @RequestMapping("hello/eureka/{name}")
    public String hello(@PathVariable String name) {
        // 2. use Eureka service name greeting-service instead of hostname and port
        String greeting = this.restTemplate.getForObject("http://greeting-service/hello/" + name, String.class);
        return greeting + " from eureka";
    }
}
Response Sample

code
Spring Boot Ribbon Sample
Spring Boot Ribbon Sample
イメージ図

eureka server ,client(service discovery) を使ってport:8001, 8002のservice instanceを起動

上記で起動している2つをRibbonを使って、交互にcallしているのを試してみました。
同じURLで、使用しているbackendのサーバは、8001,8002のポートからresponseが帰ってきています。

コードの説明はgithub READMEに記載(メモ程度ですが)
github is
GitHub - tomoTaka01/eureka-feign: Spring Boot eureka feign sample
今回は、eureka service discoveryを使用しないRibbonのサンプルです。
次回はeureka serverに登録してるservice nameを使用したRibbonのサンプルに挑戦!
