Silverlight3のPerspective 3Dを使ってみる
matarillo.com: Silverlight3でiTunesのCoverFlow
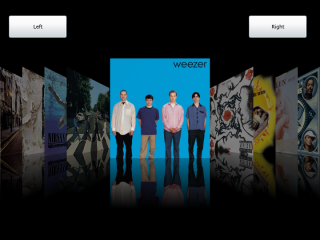
何をやったかは下の画像を見れば一目瞭然かな。Silverlight3を入れてる人はクリックすれば動作する。
アルバムジャケット表示部分は、どうやらカスタムコントロール化しておくと具合がよさそうなのでそうした。
まずはXAML。
<Canvas x:Name="LayoutRoot">
  <Canvas.RenderTransform>
    <ScaleTransform x:Name="Scaler" />
  </Canvas.RenderTransform>
  <Canvas Width="500" Height="750">
    <Canvas.RenderTransform>
      <TranslateTransform X="-250" Y="-375" />
    </Canvas.RenderTransform>
    <Canvas.Projection>
      <PlaneProjection x:Name="Rotator" CenterOfRotationX="0.5" />
    </Canvas.Projection>
    <Canvas.Clip>
      <RectangleGeometry Rect="0,0 500,750" />
    </Canvas.Clip>
    <Image x:Name="Image" Width="500" Height="500" />
    <Image x:Name="Reflection" Width="500" Height="500">
      <Image.RenderTransform>
        <ScaleTransform CenterY="500" ScaleY="-1" />
      </Image.RenderTransform>
    </Image>
    <Border Canvas.Top="500" Width="502" Height="500" Canvas.Left="-1" >
      <Border.Background>
        <LinearGradientBrush EndPoint="0.5,1" StartPoint="0.5,0">
          <GradientStop Color="#44000000"/>
          <GradientStop Color="#FF000000" Offset="0.5"/>
        </LinearGradientBrush>
      </Border.Background>
    </Border>
    <Border x:Name="Darkness" Width="500" Height="750"
      Background="#FF000000" Opacity="0" Canvas.Top="0" Canvas.Left="0" />
  </Canvas>
</Canvas>
(Silverlight3で導入された)PlaneProjectionを使って奥行きをつけるのだが、その際にCanvas.Clipで反射部分を半分切り落としておいた。そうすると、消失点の高さがアルバム接地面よりすこし高くなって、見た目がいい感じになった。
で、コントロールはこう。DependencyPropertyのあたりは本質じゃないんで省略した。
public class AlbumCover : Control
{
  #region  簡易コード
  public static DependencyProperty SourceProperty;
  public static DependencyProperty RotationYProperty;
  public static DependencyProperty ScaleProperty;
  public static DependencyProperty DarknessProperty;
  public ImageSource Source { get; set; }
  public double RotationY { get; set; }
  public double Scale { get; set; }
  public double Darkness { get; set; }
  #endregion 簡易コード

  public AlbumCover()
  {
    DefaultStyleKey = typeof(AlbumCover);
  }

  public override void OnApplyTemplate()
  {
    base.OnApplyTemplate();
    ApplySource(this.Source);
    ApplyRotationY(this.RotationY);
    ApplyScale(this.Scale);
    ApplyDarkness(this.Darkness);
  }

  private void ApplySource(ImageSource value)
  {
    Image image =
      this.GetTemplateChild("Image") as Image;
    Image reflection =
      this.GetTemplateChild("Reflection") as Image;
    if (image == null || reflection == null) return;
    image.Source = value;
    reflection.Source = value;
  }

  private void ApplyRotationY(double value)
  {
    PlaneProjection rotator =
      this.GetTemplateChild("Rotator") as PlaneProjection;
    if (rotator == null) return;
    rotator.RotationY = value;
  }

  private void ApplyScale(double value)
  {
    ScaleTransform scaler =
      this.GetTemplateChild("Scaler") as ScaleTransform;
    if (scaler == null) return;
    scaler.ScaleX = value;
    scaler.ScaleY = value;
  }

  private void ApplyDarkness(double value)
  {
    Border darkness =
      this.GetTemplateChild("Darkness") as Border;
    if (darkness == null) return;
    darkness.Opacity = value;
  }
}
コントロールが出来てしまえば、あとはアニメーションをつけるだけ。
コントロールのプロパティについては
- 回転角
- 中央は0度, それ以外は±53度
- 縮小率
- 中央は45%, それ以外は32%
- 明るさ
- 中央は100%, それ以外は50%
とし、あとはCanvas.Left, Canvas.Top, Canvas.ZIndexを動かす。
このStoryboardはBlend3を使ってXAMLで表現したんだけど、数が多くてちょっとうんざりした。繰り返しが多くてDRYじゃないし。C#コードで生成したほうが簡単だったかも。